
Earlier this year I blogged that a bunch of projects were underway here in the casa; some of you showed interest in before and after pictures. Well, when I decide to do something I jump in and get going so usually a project is about half way through before it occurs that I should have taken some before shots - by then it is too late. Actually the process generally begins months before when a kernel of thought begins to grow that something needs to be done about a certain area, then I ponder and think and experiment in my head until a plan is formed as to exactly what and how.
Anyways, the boy and I assembled a table for our "wreck room" yesterday afternoon - thereby completing (at least for this year) one room worth of projects. We've always called this area in our basement the wreck room because, though it serves several purposes, for the most part it has always been the play space. Our wreck room is a long narrow room spanning one end of our home completely - front of house to back of house. It pretty much naturally divides itself into three areas. The back end is where we have a bank of white storage shelves (those closet maid things you can buy and put together) that have held toys ranging from Barbie and Disney stuffies to K-nex, transformers, Legos, and matchbox cars. The center area is the TV viewing area so that is where the seating is as well, and the end at the back of the house has always housed a table - until yesterday a large old round table that was my mother's before being handed down to us and the site of many an art project. There are also a couple shelving units on the end with the table that have always held multitudes of art and crafting supplies for the girls (boy has never been much into the art thing).
With both girls now in apartments - having taken both the couch and love seat from the wreck room with them - and the boy (my last baby) now 13 - it was time to give the room a complete face lift, make it a more cohesive grown up space, especially as now we often use this room as a guest space for the girl's college age boyfriends and girlfriends when they come to visit. The first thing I did was paint the room a great shade of blue - it had been a moderately deep shade of blue-green which certainly contributed to making it a somewhat dark space, even though it is a very large room with two large glass doors one one end. Then I cleaned the carpet, found a great deal on a new couch and love seat (chocolate brown), upholstered a pine toy box one of the girls had made and painted many years ago in camp, cleaned out the toys - getting rid of the things that were outgrown, hung fabric panels in front of each of the shelves that didn't have doors, painted a design on the white doors of the cabinet, covered boxes to store the remaining art/craft items the girls still own (and an impressive collection of Breyer horses), repainted the vanity that is used as a TV table (this is the fourth time I've painted this vanity to match changing decor), and ordered then assembled the new - smaller - rectangular table. Finally a few blue throws and some pillows and here we are. I still need to find something to go on the wall above the couch and I want to put in crown molding - the crown is just going to have to wait for next spring.
So now, here you go - a few pictures of the finished product - each can be embiggened if you click upon them. Remember, I'm no photographer - I use a point and shoot - and have no idea how magazine room photographers do what they do - but these will give you an idea of what how we ended things in there. We really like it.
This is a look down from about 1/3 the say through, behind me and not in the picture is the wall with the toy cabinets/shelves but this gives you a good idea of how things are laid out. You can just see the tops of the chairs to the new table just behind the loveseat.

This is the new table looking back the other direction, you can see the toy cabinets back against the wall way back there. Against the wall behind the table is the cradle my father built for our 2nd, stored under the cradle in a nice neat bag is the inflatable queen mattress we bought this spring for guests. When it is set up we center it against the toy cabinet in the back of the room. In the cradle (tightly packed in "space bags" are a big feather bed and nice pillows that we use on the mattress and folded on the top is the quilt with which we finish the whole thing.

This is the shelf (the hub built back in our first year or so of marriage - ya know, the year before Noah built the ark) and the banker's boxes I covered with chocolate colored microfiber fabric to store the art stuff and horse models.

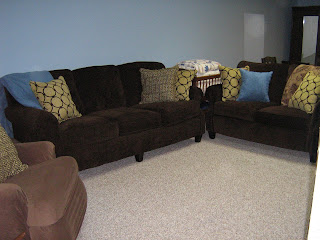
This picture is pretty dark but the new couches are chocolate colored so I don't know how to get a better shot. The recliner there on the left is one of the first pieces we ever bought - I've reupholstered it once before and now it is slip covered. It just goes on and on...
Here are the toy cabinets, the fabric doesn't show well here - I've tried several times but I can't get the light to really co-operate. Ah well, take it from me the fabric is chocolate brown with a geographic pattern in a silvery white. I painted the designs on the doors to add texture and try to pull it together. Those tubs on top hold a multitude of K-nex and Legos.

A close up of the door design - came up with it all my myself and put it on with Sharpie paint pens.

The wall with the TV - here you can see the curtains over the shelves better. Guess what I used? Two fabric shower curtains that I cut to fit then hemmed the sides and tacked across the top with silver upholstery tacks and about 18 inches up from the bottom on each side I used velcro strips to secure them to the edge of the cabinets and keep them hanging flat and straight.


This final picture is the pine box I upholstered.
I'll show more projects in other areas tomorrow - or the next day - or whenever I find time to sit here and do it : )
Anyways, the boy and I assembled a table for our "wreck room" yesterday afternoon - thereby completing (at least for this year) one room worth of projects. We've always called this area in our basement the wreck room because, though it serves several purposes, for the most part it has always been the play space. Our wreck room is a long narrow room spanning one end of our home completely - front of house to back of house. It pretty much naturally divides itself into three areas. The back end is where we have a bank of white storage shelves (those closet maid things you can buy and put together) that have held toys ranging from Barbie and Disney stuffies to K-nex, transformers, Legos, and matchbox cars. The center area is the TV viewing area so that is where the seating is as well, and the end at the back of the house has always housed a table - until yesterday a large old round table that was my mother's before being handed down to us and the site of many an art project. There are also a couple shelving units on the end with the table that have always held multitudes of art and crafting supplies for the girls (boy has never been much into the art thing).
With both girls now in apartments - having taken both the couch and love seat from the wreck room with them - and the boy (my last baby) now 13 - it was time to give the room a complete face lift, make it a more cohesive grown up space, especially as now we often use this room as a guest space for the girl's college age boyfriends and girlfriends when they come to visit. The first thing I did was paint the room a great shade of blue - it had been a moderately deep shade of blue-green which certainly contributed to making it a somewhat dark space, even though it is a very large room with two large glass doors one one end. Then I cleaned the carpet, found a great deal on a new couch and love seat (chocolate brown), upholstered a pine toy box one of the girls had made and painted many years ago in camp, cleaned out the toys - getting rid of the things that were outgrown, hung fabric panels in front of each of the shelves that didn't have doors, painted a design on the white doors of the cabinet, covered boxes to store the remaining art/craft items the girls still own (and an impressive collection of Breyer horses), repainted the vanity that is used as a TV table (this is the fourth time I've painted this vanity to match changing decor), and ordered then assembled the new - smaller - rectangular table. Finally a few blue throws and some pillows and here we are. I still need to find something to go on the wall above the couch and I want to put in crown molding - the crown is just going to have to wait for next spring.
So now, here you go - a few pictures of the finished product - each can be embiggened if you click upon them. Remember, I'm no photographer - I use a point and shoot - and have no idea how magazine room photographers do what they do - but these will give you an idea of what how we ended things in there. We really like it.
This is a look down from about 1/3 the say through, behind me and not in the picture is the wall with the toy cabinets/shelves but this gives you a good idea of how things are laid out. You can just see the tops of the chairs to the new table just behind the loveseat.

This is the new table looking back the other direction, you can see the toy cabinets back against the wall way back there. Against the wall behind the table is the cradle my father built for our 2nd, stored under the cradle in a nice neat bag is the inflatable queen mattress we bought this spring for guests. When it is set up we center it against the toy cabinet in the back of the room. In the cradle (tightly packed in "space bags" are a big feather bed and nice pillows that we use on the mattress and folded on the top is the quilt with which we finish the whole thing.

This is the shelf (the hub built back in our first year or so of marriage - ya know, the year before Noah built the ark) and the banker's boxes I covered with chocolate colored microfiber fabric to store the art stuff and horse models.

This picture is pretty dark but the new couches are chocolate colored so I don't know how to get a better shot. The recliner there on the left is one of the first pieces we ever bought - I've reupholstered it once before and now it is slip covered. It just goes on and on...

Here are the toy cabinets, the fabric doesn't show well here - I've tried several times but I can't get the light to really co-operate. Ah well, take it from me the fabric is chocolate brown with a geographic pattern in a silvery white. I painted the designs on the doors to add texture and try to pull it together. Those tubs on top hold a multitude of K-nex and Legos.

A close up of the door design - came up with it all my myself and put it on with Sharpie paint pens.

The wall with the TV - here you can see the curtains over the shelves better. Guess what I used? Two fabric shower curtains that I cut to fit then hemmed the sides and tacked across the top with silver upholstery tacks and about 18 inches up from the bottom on each side I used velcro strips to secure them to the edge of the cabinets and keep them hanging flat and straight.


This final picture is the pine box I upholstered.
I'll show more projects in other areas tomorrow - or the next day - or whenever I find time to sit here and do it : )
|


 "I pledge allegiance to the flag of the United States of America, and to the republic for which it stands, one nation under God, indivisible, with liberty and justice for all."

Oh, my gosh Patti! You are so creative!! (Not to mention industrious!)
The space is beautiful and contemporary... you'd never know those lovely boxes held toys! Brava to you and Bravo to the boy for his part!
Did you use a stencil for the design on the doors or is that free hand? Wonderful!
No stencil - I fiddled around on paper until I had what I wanted then transferred it to the doors with carbon paper. And thanks.
Very nice indeed! I have to sit and think about stuff for several years before I can come up with anything half as good!!! LOL.
Patti,
Glad to hear that Space Bag can help condense your bedding and that you were able to finish redecorating your extra space. Just wanted to drop by and let you know that Space Bag has an online community dedicated to getting organized and saving space. There member stories and articles for all types of organizing. We would love for you to stop by www.SpaceSaversCommunity.com and share your story or user review.
Best,
Space Savers community correspondent
And on the VCR and DVD player there is usually a Wii and a Nintendo Game Cube, but they are in my bedroom right now.
looks great! love that shade of blue. I'm a big fan of blue but married a blue-racist, so no blue for us!
In the coming year or two, I'm really going to have to look into reupholstering my couch and chair. Dreading it! But the husband is even starting to see the need, so you know my furniture is looking ragged. But hey, I bought them in 1999, so that's ok, right?
I wish updating my house was a simple as painting. Stupid textured walls.
Yeah, I feel your pain on the textured walls thing...